5/25/2016 5:34:18 PM by
Teronsuke
(Edited: 5/27/2016 12:16:51 AM)
Views: 1232
Questions? Comments? Need more help? Please visit the offical discussion thread:
MEMBERSHIP GALLERIES:
Membership galleries are like you very own personal membership site, YOU will control how much content your members see and YOU will set how many points they must pay once or each month to see it.
HOW DOES IT WORK?
You create one or more membership gallery folders, and then add images to it/them.
Your galleries can either be
“Permanent” which means you will not be adding content to it in the future and your members will only be charged one time
“Recurring” which means you WILL be adding new content to it in the future (we suggest weekly, bi-weekly or monthly updates) and your members will be charged the same amount of points every month
Once your membership gallery/galleries are created and live for sale, viewers will choose if they want to buy a membership, IF they do, points are taken out of their account and they are granted access to your membership gallery.
IF the membership is recurring, then at the end of the first month points are taken out of the viewers account and their access is extended for another month IF Points are NOT in the viewer's account, then they will be notified that they have a membership subscription coming up and that they need to purchase more points, if they do not reload their points their access to your membership gallery is removed. And they will have to resubscribe again to regain access.
HOW DO I GET PAID?
Each time someone subscribes to one or more of your memberships, points will be placed into your account, each month,as long as you have enough points in your account for a payout those points will be removed and converted into a payout using your preferred payout method.
HOW TO CREATE AND MAINTAIN MEMBERSHIP GALLERIES:
In this tutorial you will learn how to setup your first Membership Gallery and how to maintain it.
We hope you take full advantage of this exciting new feature!
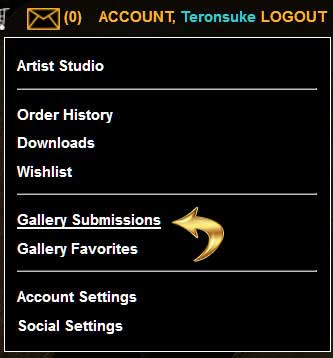
1: Login to your account and then HOVER over “Account” and click on “GALLERY SUBMISSION” as shown below.
2: Now click on “MEMBERSHIP ROOT” on the right hand side of your screen as shown below:

3: Now click on “NEW MEMBERSHIP FOLDER” OR “ADD MEMBERSHIP FOLDER” near the top right of your screen as shown below:

4) Now fill out the fields, set your copy protection if you want too and select who can comment and or rate images in this folder as shown on the screen as seen below:

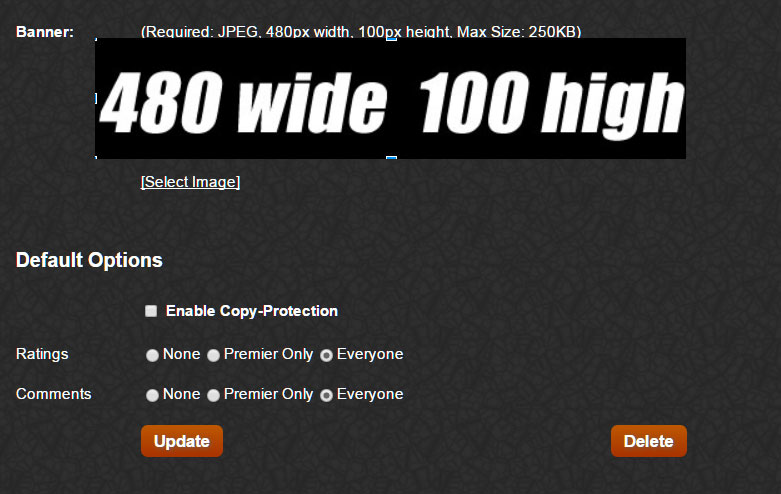
5) Next you will add your folder Thumbnail, refresh the page to get the following screen:

the thumbnail needs to be 480 pixels wide X 100 pixels tall. After you have added and uploaded the thumbnail simply hit UPDATE as shown below:

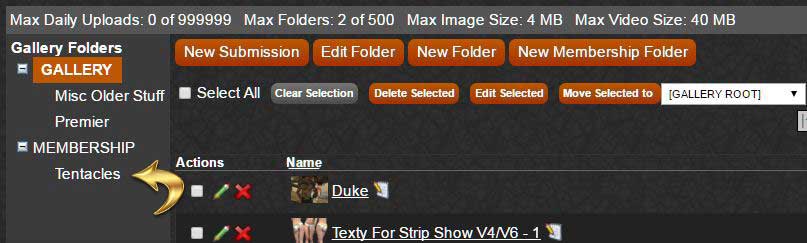
6) Now it is time to add images to your newly created membership gallery, to do this FIRST make sure you are IN your new gallery by clicking on SUBMISSIONS to the right of your screen and then clicking on the name of your folder as shown below

6B) IF you only want to have your images located loose in one folder please skip to step 7) below, but if you want to have multiple folders / galleries please continue to 6C below)
for example if you want your membership gallery to be something like this….
MASTER FOLDER / Name Of Membership Gallery: “Summer Time Fun”
Image set “Fun In The Sun”
Image set “Bikini Babes”
Image set “Wet & Wild”
Image set “Bonfire Nights”
Image set “Sun N Sports”
You will need to repeat this step 5 times to make all of the sub folders as follows:
6C) To create sub folders in your gallery, FIRST make sure you are inside the root gallery itself as shown above, and then simply click NEW MEMBERSHIP FOLDER as shown above, give this new folder the proper name you need and then save it. You will repeat this step for each sub-gallery you need to have in your membership gallery.
Having sub folders in your membership gallery is a bit more work BUT it will keep your content much more organised as well as making it much easier for your members to navigate your content
7) Once you are INSIDE your new gallery, click on NEW SUBMISSION as shown below:

8) Now you will add images like you normally would to the main gallery, please see the images below for reference on the various fields you’ll need to fill out. You can add as many images in this step as you want your gallery to include and or have ready for upload.

PLEASE NOTE,
If you are adding multiple image sets to one gallery, it’s best to upload each series one at a time.
IF you are adding multiple image sets, you will need to wait between set uploads as your images are created, once you click the SAVE button you should see a screen similar to this, simply wait till all your images have been created and then repeat Step 8 above as many times as you need to.
9) Now select which you are uploading as shown below, for this tutorial we will be adding a new image to the gallery
10) First, select your membership gallery from the drop down list shown below and then give your image a name, and select the level of the image and then click NEXT

11) Now enter both the short description and long description for your image, you may also now switch to our classic “SINGLE FORM” where all fields will be on one page by clicking the SWITCH TO SINGLE FORM button as shown below, for this tutorial we will be using the wizard, so once you have entered in your short and long descriptions click the NEXT button

12) Now select the proper categories if applicable and click NEXT and then fill out your image/s Preferences and click NEXT
13) Now select wether or not your image will be hidden or not (hidden images will not appear in the main gallery OR your own gallery until you unhide them) Select who can rate and or comment on your image and enter in keywords that best describe your image and then click NEXT

15) Now you will add your image/s for upload, to do this you can either drag files right into the box shown below OR click on the ADD FILES button, if you are uploading a series of images then enter the start number (ie 001) in the box below and then click FINISH.

16) Once your image/s have been uploaded you should see something similar to what is shown below:

When all images have finished uploading and have been processed, you should see something similar to below:

17) Now it’s time to setup your actual membership, to do this simply go back to your MEMBERSHIP ROOT by clicking on MEMBERSHIPS as shown below:

18) As you do not have any memberships created yet you will first need to click on the NEW MEMBERSHIP button shown below:

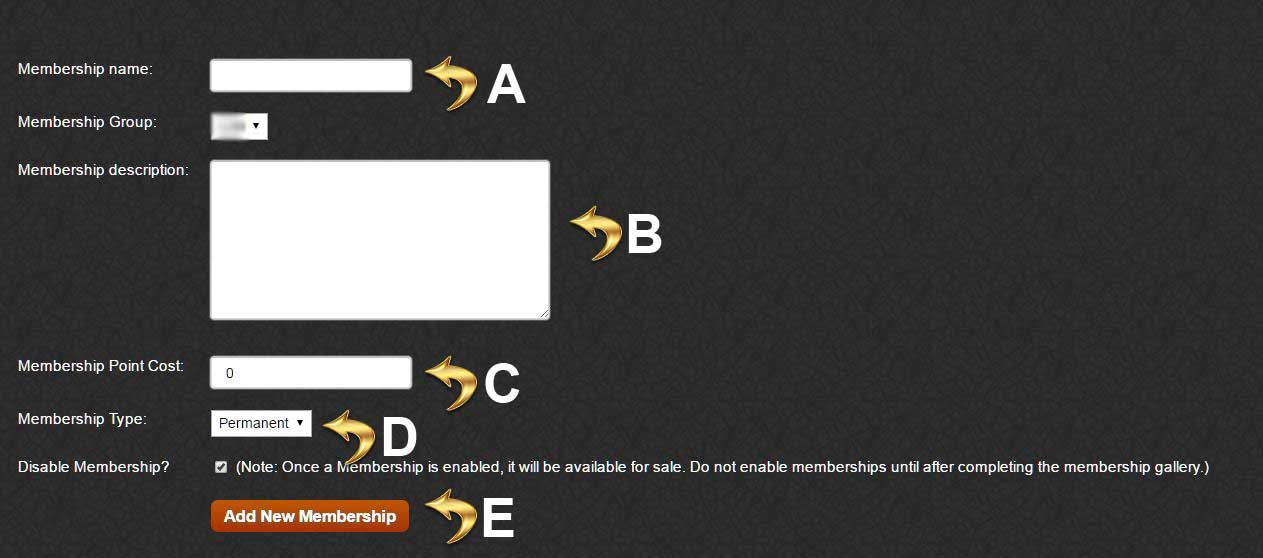
19) Now you will fill out four fields as seen in the image below:
-
Give your membership a name
-
Describe your membership, what’s included, how much content, is it updated and if so when?
-
Setup how much the membership will cost people, for reference, each point is worth 1 cent to you upon payout, keep this in mind when setting up how much to charge for your memberships
-
Choose whether the above point charge is a 1 time charge or a monthly charge
PLEASE NOTE: If you setup your memberships to be recurring charges then you should add content to the membership folders on a regular basis, if you’d rather just add content and not update it, then use the permanent charge option above.
20) Once you’ve hit ADD NEW MEMBERSHIP you will now see 3 new tab buttons at the top of your screen as shown below:

21) Now let’s add your image folders to your newly created membership, to do this simply click on FOLDERS as shown above.
22) now click on the ADD button for any folder you wish to add to this membership as shown below:

23) IF you are also a vendor on the site, you can also include one or more of your products as a “bonus” to the membership, to add a product simply click on PRODUCTS shown above and you will then see something similar to below:

24) IF you are including a bonus product
A: Click on the SELECT button and navigate to your product, if you know the SKU number of the product you wish to include you can enter that into the text field and then click SELECT instead.
B:By clicking the dropdown button you can select to give the bonus to ALL current members (best for static / permanent memberships) OR choose between 1 - 12 month members, meaning that only after a member has renewed X times will they get the bonus. You can setup multiple bonuses be simply repeating these steps, and ultimately you could give recurring members a unique bonus every month for 12 months.

25) Once you are done setting up your folders and or bonus products click the GENERAL button again as shown below:
26) If you have finished setting up all of the content you want in this membership then, at the bottom of that page uncheck the DISABLE MEMBERSHIP box and click the UPDATE button:

To verify your Membership Gallery is ACTIVE and ready for subscribers please click on the GALLERY tab at the top of any page of the site and then "MEMBERSHIP GALLERIES" on the right side of the screen, you can also just click this link to get right to the membership gallery section:
http://www.renderotica.com/gallery/memberships
CONGRATULATIONS! Your membership is now LIVE and ready for customers!
Questions? Comments? Need more help? Please visit the offical discussion thread: